Ulysses loves WordPress

The Ulysses App was just released with a version that includes publishing to WordPress. Previously there was just Medium publishing in the app. Now you can write your blog post and directly post it to your WordPress blog.

The first Heading will be the title. The first picture, the posts features image. You can chose excpert, categories and more.

So why not write directly in WordPress instead of Ulysses? I’m not sure. Though I believe Ulysses is a much better writing tool for you. And I always think it’s cool with integration between different apps and web services.

Ulysses is available for both iOS and macOS.

Advertisement

Selfies at Sacre-Cœur

Recently I went for a short trip to Paris. It was my third time there. Wanted to try out my new Leica Q. Again I tried to get along without my MacBook. Just had the iPad Pro with me.

I talked in an earlier post about trying to get the RAW picture into my iPad by connecting it directly to my camera via USB. Well that didn’t work as expected since the Leica Q makes DNG files directly in the camera. And appearently iOS cannot import those. So I am stuck with just importing JPG’s. Since I am currently mostly using black and white settings in camera, the only thing I have to work with after importing to the iPad is those black and whites.

Below is one of the pictures I took on this trip. It is taken just below the Sacre-Cœur. If you click the picture it will open in Flickr.

Selfie at Sacré-Cœur


Working with iPad Only (part 2)

This weekend I went on a short 2 day trip to Helsinki. And I thought it would be a good opportunity to try how it would be to for the first time not bring my MacBook. One reason for the trip was to do some photographing with my new Leica Q. Now I could try a workflow including only my camera, my iPad and the Lightning to SD Card connector. So how did it turn out?

Well, not very good. Ok, but I didn’t find it too useful for a couple of reasons. But I learned something in the process.

  1. With the Lightning to SD Card Camera Reader you cannot import RAW files to the iPad. Something I already had learned when writing the previous article. What I learned though is that it should be possible with a Lightning to USB adapter if I connect it directly to the camera. So the connector I bought is basically useless to me. Well in any way as long as I need the RAW files for any reason. For example, this time I chosed to photograph in monochrome as an excercise to better see the Lightning of the scene. This means that the JPG’s will be monochrome, and you can’t import the colored RAW files. So I would need a Lightning to USB, and connect directly to the camera and maybe get the option to get the RAW’s.
  2. The import with the Lightning to SD Card Camera Reader connector is too slow, and you cannot preview the picture before importing them. Sure, you can choose to import all and they will end up in your Photos app. It will probably take some time though. Then you can view them there and delete the ones that are not good. In this case it might be better to use the Leica app on the iPhone where it’s possible to preview before import.
  3. Editing in Lightroom Mobile is ok. It’s not great in my opinion, but it works depending on how good the picture is coming out of the camera. In other words, if you’ve done your job while shooting. For example cropping is not so smooth. It can be hard to do fine adjustments. When you use touch to drag the cropping to desired position and release it sometimes jump at bit further. Also I found that updating the screen while adjusting exposure, shadows etc lagged a bit, making it hard for fine adjustments.

Maybe most of the above is something I can handle by getting used to it. But at the moment it feels like it’s not 100% ready for ditching the MacBook. I might try with the Lightning to USB and connect directly to the camera. I also ordered the iPad Pro 9.7″ today. Maybe some more processing power will make Lightroom Mobile smoother to use.

One thing that I’ll guess needs to be handled by an IOS update sometime is the possibility to import directly to a different app than the Photos app. I don’t want to clutter my library there with maybe a 100 or more pictures taken during a day, which will also sync to all my other devices.

Update: Just read that the Lightning to USB cable is included with the purchase of the iPad Pro. Great!

Previous article in this series: Working with iPad only (part 1)

2015 Favorite Apps: Part 3 Enlight

Enlight

As a hobby photographer I often think about the possibility to do all editing and organization of my pictures on my iDevices. To be able to live without the MacBook and just have my iPad and iPhone. For me there is still not the right apps and power in those iDevices to make the switch completely. I am still dependent on Lightroom and Photoshop and their versions on OSX. There I can also use my beloved plugins from (previously) Nik Software (now owned by Google).

When it comes to organizing pictures I still haven’t come close to find anything. My picture library is kind of a mess. But when it comes to editing I think technology will soon be there. I know there is Lightroom for IOS. But that version is still far from the desktop version in my opinion. With the new powerful iPad Pro, I think it will not be long until we get an almost similar version of Lightroom on iOS as we have on OSX. The current Lightroom for iOS is for me a bit awkward to do my editing in. I feel a bit out of control when using it.

One app that I’ve been using for a long time now, and that I think takes a big step forward in editing photos on iOS, is Enlight from Lighttricks Ltd I find it easy to use, it has a clear workflow if you want to follow it, and some good editing tools. It is available for both iPhone and iPad.

img Enlight’s sidebar: collapsed to the left, and expanded image category to the right

It has a sidebar on the right with 8 editing categories. The order of the categories could be seen as a good workflow to follow. The first – Canvas – is all about cropping, rotating, skewing the picture. A good place to start if any of those operations is needed. It continues with the Image category where you can do editing like brightness, contrast, sharpness, shadows and highlights etc. You can start with one of the many presets provided, where you also can set the intensity of the preset. Pressing to tools button in the bottom of the screen reveals a number of tools to do a more detailed editing of the picture.

In the beginning I had a hard time finding the different tools, like brightness, sharpness and so on. But after a while I realized they are quite logically placed.

Of course you don’t have to use each category in the workflow when editing your picture. But I found myself often using the Image section’s adjust and clarity tools. Sometimes it’s enough to just use one of the presets for those tools. Other times I adjust the intensity of them or use more detailed editing by pressing the tools button. It gives me good options whether I need to just to some light editing or if I need to do some more heavy editing. Enlight’s interface makes it easy to work with the pictures in my opinion, and it feels like I am in control of what I am doing unlike many other apps I’ve tried.

img-2 
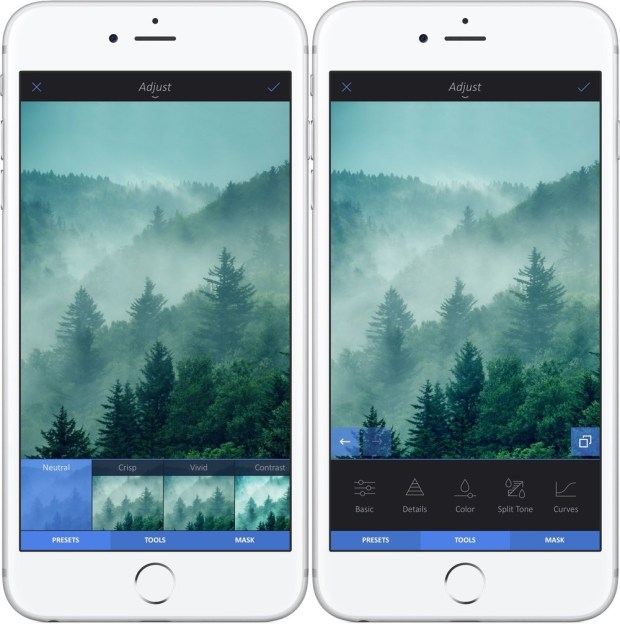
Examples of Enlight’s presets to the left. To the right some of the tools revealed after pressing the tools button.

One feature that I haven’t tried so much yet is the possibility to save you editing session and come back later to finish it. It can be found in the top toolbar of the app if pressing the share icon. The Share Toolbar also lets you share multiple photos at once.

The app has a built-in tour to get started quickly. And recently they also added a couple of tutorials for doing for example “Dramatic Portrait” and “Double Exposure”.

Enlight has a lot of tools in the app. More than I will cover in this post. But what I found is that, besides being easy to use and with a number of powerful tools, the editing gives a good quality and doesn’t “destroy” the image. Besides some very basic editing in iOS’s built in Picture App, this is the app I keep coming back to to do my editing. I’ve been using it for some time now, and it is one of my favorite apps of 2015

Get it from the App Store here:
Enlight av Lightricks Ltd.

Previous Post in this series:
2015 Favorite Apps: Part 1 Unread
2015 Favorite Apps: Part 2 1Password

2015 Favorite Apps: Part 2 1Password

1Password

This is an app that I’ve been using almost since it was born. 1Password is a Password manager, but it is more than that. It is for example also Secure Wallet where you can store Your credit card information for easy access when, for example, makin online purchases.

1Password

It has a strong password generator where you can customize the size and ingredients of the generated password. Good to have when creating new logins.

With 1Password you can also organize you logins with folders, and mark often used logins as favorites for quick access in the favorite list. It also has a built in browser which opens and logs in if you tap one of the logins in your 1Password vault. I very seldom use the built-in browser myself. Instead I use the more cumbersome workflow of opening 1Password and copying/pasting the passwords into Safari for some reason.

If you’re using 1Password on multiple devices you can easily sync the vault between them via iCloud, Dropbox or Wifi. The app is also available for Mac OSX, Windows and Android.

Recently it is also available for the Apple Watch. A feature I personally haven’t yet found any use for in how I use 1Password currently. It feels like it’s as easy to open the app on my iPhone (which I always have with me) and get the info I want from there. I can imagine that it could be of more use if using secure notes or one time passwords for two factor verification.

Besides all the above, I see that more and more apps in the App Store has built in integration with 1Password so you can use it to login within the app itself.

I admit I haven’t tried many other password managers, but I am very pleased with 1Password. It gets the job done. I always have it at hand via the iPhone, iPad, MacBook or Apple Watch (should I want to). And it makes it possible to have many different strong passwords that I do not have to remember. I only have to remember the master password to the vault and/or use Touch ID to login to the app. It has a lot of more features than I use on a daily basis. You can read up on more details on their website.

Get it from the App Store here:

1Password – Password Manager and Secure Wallet av AgileBits Inc.

Previous Post in this series

2015 Favorite Apps: Part 1 Unread

New year and some new apps

I have recently bought me a couple of iOS apps that I found interesting and are currently evaluating. To me they all bring something new to my iPad and iPhone. One thing they all provide is the possibility to automate certain things in iOS. The apps are:

  • Editorial -a very nice word processor with built in workflow automation and a lot of other good stuff. It has a lot of functions, that makes it much easier to type.
  • Pythonista – a tool that makes it possible to develop Python scripts in iOS.
  • Launch Pad Pro – to automate different actions in iOS.

Editorial and Pythonista is from the same developer (Ole Zorn) Launch Pad Pro was developed by a company called Contrast, and has currently only an iPhone version of the app. It runs also on iPad but in a stretched out portrait mode.

I have never tried to develop anything in Python, but I guess I’ll need to learn some now. There are some good reviews on each of the apps over at Mac Stories.

I wrote this blog post in Editorial as Markdown, using some workflows for inserting and formatting links.

Edit mode in Editorial

Edit mode in Editorial